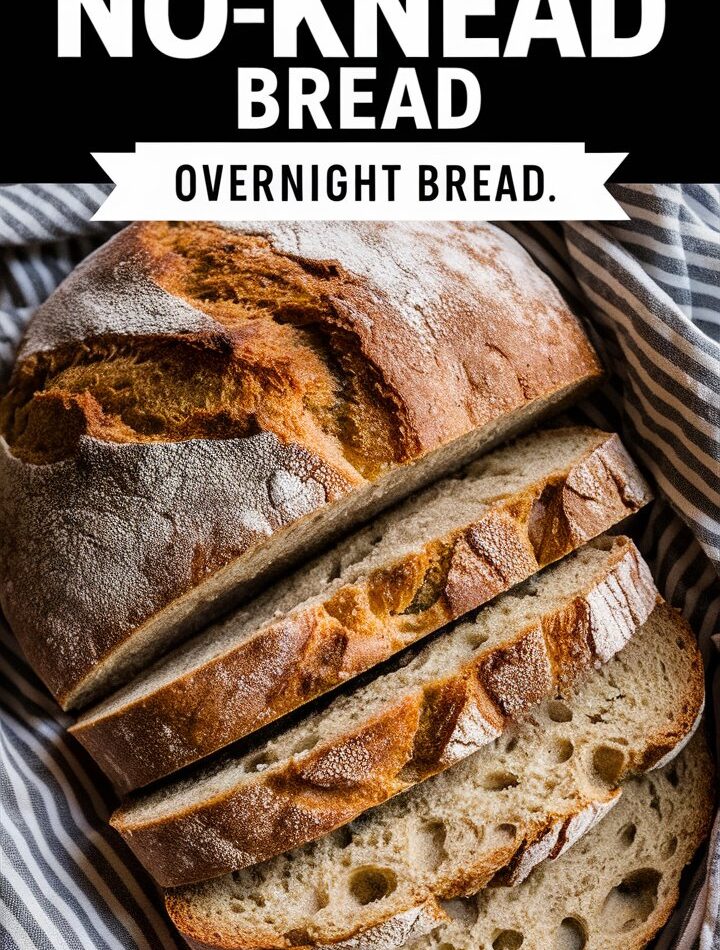
Homemade bread has a way of making any kitchen feel like the heart of a home. The aroma, the warmth, the rustic look—it all adds up to something more than just food. But for many, the idea of baking bread from scratch sounds intimidating: kneading, proofing, complicated tools, and hours of attention. That’s where no-knead Dutch oven bread changes everything.
This guide isn’t just a recipe; it’s a journey into lazy baking perfection. No mixer, no kneading, no stress—just a handful of pantry ingredients and a little patience. And the reward? A golden, crispy crust with a soft, airy interior that rivals the best artisan bakeries.
Whether you’re a seasoned baker or a total beginner, this easy recipe is your gateway into the comforting world of homemade bread.
2. Why No-Knead Bread Is the Ultimate Beginner Recipe
✅ No Experience Needed
You don’t need culinary training or a stand mixer. If you can stir flour and water, you can make this bread.
✅ Low Effort, High Reward
Most of the “work” is just letting the dough rest. You mix it once, forget about it, and come back to magic.
✅ Budget-Friendly
Made with just four ingredients—flour, salt, yeast, and water—it’s one of the most affordable ways to impress in the kitchen.
✅ Flexible Timing
Let the dough rise overnight or while you’re at work. The recipe bends to your schedule.
3. What Makes Dutch Oven Bread So Special
Using a Dutch oven replicates the high-humidity environment of a professional bread oven. When the lid is on, it traps steam from the dough, which helps create:
- A crisp, crackling crust
- An even golden-brown color
- A light, bubbly crumb texture inside
No Dutch oven? Don’t worry—I’ll share alternatives later in the article.
4. Ingredients Breakdown and Substitutes
1. All-Purpose Flour
Reliable and easy to work with. Want a slightly chewier texture? Substitute ½ cup with bread flour.
2. Salt
Essential for flavor. Use sea salt or kosher salt for best results. Avoid skipping it—bread without salt tastes flat and dull.
3. Instant Yeast
Also known as rapid-rise yeast. No need to proof it—just mix it straight in. You can use active dry yeast as a substitute, but allow extra rise time.
4. Warm Water
The temperature should feel warm to the touch, not hot. Around 100–110°F (38–43°C) is ideal. Hotter water may kill the yeast.
5. Optional Add-Ins
Want to experiment? Try:
- Herbs like rosemary or thyme
- Garlic powder or chopped roasted garlic
- Shredded cheese
- Chopped olives or sundried tomatoes
- Seeds (flax, sesame, poppy)
5. Step-by-Step: How to Make No-Knead Dutch Oven Bread
Ingredients
- 3 cups all-purpose flour
- 1.5 cups warm water
- 2 teaspoons salt
- ½ teaspoon instant yeast
- Extra flour for dusting
Instructions
Step 1: Mix the Dough
In a large bowl, combine flour, salt, and yeast. Add warm water and stir with a wooden spoon or silicone spatula until a rough, sticky dough forms. Don’t overmix—it’s not supposed to look pretty.
Step 2: Let It Rest
Cover the bowl with plastic wrap or a clean towel. Let it rest at room temperature for 12–18 hours. This long fermentation builds flavor and structure.
Step 3: Preheat the Dutch Oven
About 30 minutes before baking, place your empty Dutch oven (with the lid) into the oven and preheat to 450°F (230°C).
Step 4: Shape the Dough
Flour your hands and a clean surface. Gently turn the dough out of the bowl, shape it into a round loaf (don’t worry about perfection), and let it rest on parchment paper for about 30 minutes.
Step 5: Bake
Remove the hot Dutch oven, carefully lift the dough using the parchment paper, and place it inside. Cover and bake for 30 minutes. Then remove the lid and bake for another 10–15 minutes until the crust is golden brown.
Step 6: Cool Before Slicing
Let the bread rest on a cooling rack for at least 20–30 minutes. Cutting too early may result in a gummy texture inside.
6. Tips to Perfect the Crust and Texture
- Use quality flour. It doesn’t have to be expensive, but avoid bleached low-gluten varieties.
- Avoid over-handling. The dough is delicate; rough shaping deflates its air bubbles.
- Don’t skip the preheat. The hot Dutch oven is what gives the bread its crust.
- Use parchment paper. It makes transferring and cleanup easier.
- Steam is key. Keep the lid on during the first half of baking—this traps moisture.
7. Common Mistakes and How to Fix Them
| Mistake | Problem | Solution |
|---|---|---|
| Dough is too wet | Loaf spreads flat | Add 1–2 tbsp flour next time |
| Crust is too thick | Overbaking or oven too hot | Check oven temp with thermometer |
| Dough didn’t rise | Yeast inactive | Use fresh yeast and warm water |
| Gummy inside | Cut too soon | Let bread cool fully before slicing |
8. Storing, Freezing, and Reheating Tips
🧊 Room Temperature
Wrap cooled bread in a clean cloth or place in a paper bag. Keeps the crust crisp for 1–2 days.
🧊 Airtight Storage
Use a sealed container for up to 3 days. The crust softens but the inside stays moist.
❄️ Freezing
Slice the bread and freeze with parchment between slices. Toast or warm in the oven directly from frozen.
🔥 Reheating
- Whole loaf: Wrap in foil and heat at 300°F (150°C) for 10 minutes.
- Slice: Toast lightly for a fresh-baked crunch.
9. Flavor Variations and Add-Ins
| Variation | Add-Ins |
|---|---|
| Herb Loaf | 2 tsp dried rosemary or thyme |
| Garlic-Parmesan | 1 tsp garlic powder + ½ cup shredded parmesan |
| Olive & Herb | ¼ cup chopped olives + Italian seasoning |
| Cheddar-Jalapeño | ½ cup cheddar + 1 tbsp diced jalapeño |
10. Pairing Ideas: What to Serve With Homemade Bread
This bread is so versatile, it can go with almost anything:
- Breakfast: Toasted with butter, jam, or avocado
- Lunch: Sliced with cheese, soup, or salad
- Dinner: With pasta, chili, or roasted vegetables
- Appetizers: Serve with olive oil and balsamic dip or cheese board
- Dessert: Toast with cinnamon sugar and honey
11. FAQs About No-Knead Bread
Q: Can I use whole wheat flour?
A: Yes, but replace only up to 50% of the all-purpose flour to avoid making the bread too dense.
Q: What if I don’t have a Dutch oven?
A: Use a heavy oven-safe pot with a lid, or bake in a cast iron skillet and place a tray of water in the oven for steam.
Q: Why is my dough so sticky?
A: That’s normal. It’s a high-hydration dough. Dust your hands with flour or oil to handle it easily.
Q: How can I make it gluten-free?
A: Use a gluten-free 1:1 flour blend designed for yeast recipes, but expect a slightly different texture.
12. Final Thoughts: Why This Recipe Belongs in Every Kitchen
This no-knead Dutch oven bread recipe is more than just a baking hack—it’s a game-changer. With minimal effort and basic ingredients, you can make something that feels (and tastes) gourmet. It’s perfect for busy people, beginner bakers, or anyone craving a warm, comforting slice of bread without the usual hassle.
Try it once, and you’ll keep coming back—because there’s just something magical about pulling a golden loaf from your own oven.
13. Nutrition Facts (Per Slice)
Serving Size: 1 slice (1/12 of loaf)
- Calories: 120
- Carbohydrates: 24g
- Protein: 4g
- Fat: 0.5g
- Sodium: 390mg
- Sugar: 0g
- Fiber: 1g
14. Printable Recipe Card
markdownCopyEditNo-Knead Dutch Oven Bread – Easy Homemade Recipe

Ingredients:
- 3 cups all-purpose flour
- 1.5 cups warm water
- 2 tsp salt
- ½ tsp instant yeast
- Extra flour for dusting

Instructions:
1. Mix flour, salt, and yeast in a bowl. Add warm water and stir until shaggy.
2. Cover and rest 12–18 hours at room temperature.
3. Preheat Dutch oven to 450°F (230°C).
4. Shape dough on floured surface. Rest 30 minutes.
5. Transfer to Dutch oven using parchment paper. Cover and bake 30 mins.
6. Uncover and bake another 10–15 mins until golden.
7. Cool on rack before slicing.
