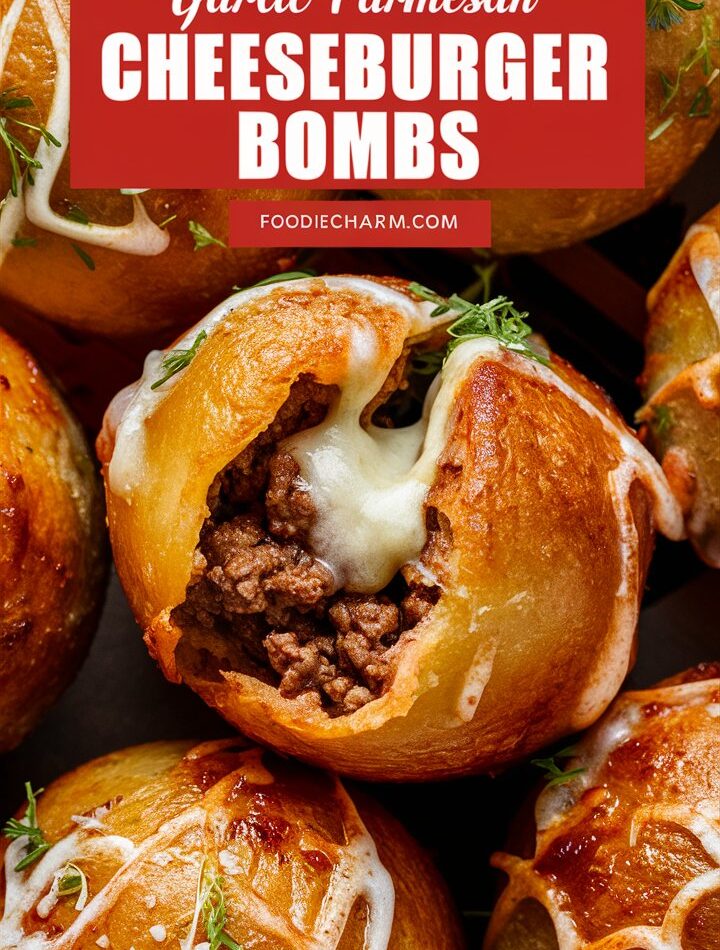
If you’re on the hunt for a quick, crave-worthy dinner idea that combines the comfort of cheeseburgers with the indulgence of garlic butter and flaky pastry, look no further. These Garlic Parmesan Cheeseburger Bombs are the perfect mashup of cozy and fun—crispy on the outside, gooey and savory on the inside, and easy enough to whip up on a busy weeknight. Whether you’re feeding a hungry family or hosting a party, this dish will have everyone reaching for seconds.
In this guide, we’ll walk you through everything you need to know—from ingredients and step-by-step instructions to expert tips, make-ahead ideas, storage solutions, and even creative variations. This is more than a recipe—it’s your complete guide to mastering one of the most delightful easy ground beef recipes you’ll ever make.
🧡 Why You’ll Love These Cheeseburger Bombs
These Garlic Parmesan Cheeseburger Bombs are a kitchen favorite for so many reasons:
- Quick & Easy: From prep to plate in under 30 minutes.
- Minimal Ingredients: You probably already have most of these on hand.
- Family-Friendly: Kid-approved and perfect for picky eaters.
- Make-Ahead Friendly: Ideal for meal prep, parties, or freezing.
- Endlessly Customizable: Use any cheese, add veggies, or swap the meat!
With buttery garlic flavor, melted cheddar, and juicy seasoned beef all tucked inside flaky biscuit dough, these bombs hit every note of a satisfying comfort food dish—without requiring hours in the kitchen.
🧀 Key Ingredients & Variations
Let’s dive into the star players in this recipe and how you can customize it:
Main Ingredients
| Ingredient | Purpose | Notes |
|---|---|---|
| Ground Beef (1 lb) | The base of the filling | Choose 80/20 for juicy flavor or lean for less grease |
| Taco Seasoning (1 packet) | Adds depth & spice | Use homemade or store-bought |
| Water (1/4 cup) | Blends seasoning evenly | Prevents dryness during baking |
| Refrigerated Biscuit Dough (1 can, 8-count) | The “bomb” wrapper | Crescent rolls or pizza dough also work |
| Shredded Cheddar Cheese (1 cup) | Classic cheeseburger flavor | Mozzarella, Monterey Jack, or Swiss can be used |
| Butter (1/4 cup, melted) | For brushing & richness | Unsalted or salted is fine |
| Garlic Powder (1/2 tsp) | Adds bold garlic flavor | Combine with butter for flavor coating |
| Grated Parmesan Cheese (2 tbsp) | Crispy, savory topping | Optional but highly recommended |
| Dried Parsley (optional) | Garnish | Adds color and a hint of herby flavor |
🍔 Step-by-Step Recipe Instructions
Step 1: Preheat Oven
- Preheat your oven to 375°F (190°C).
- Line a baking sheet with parchment paper to prevent sticking and ensure even browning.
Step 2: Cook the Beef
- In a skillet over medium heat, brown 1 lb ground beef.
- Drain any excess grease to prevent sogginess.
- Stir in 1 packet of taco seasoning and 1/4 cup water.
- Let simmer for 2–3 minutes until thickened and flavorful.
Step 3: Prep the Biscuit Dough
- Open 1 can of refrigerated biscuit dough.
- Separate and gently flatten each biscuit into a 4-inch circle using your hands or rolling pin.
Step 4: Assemble the Bombs
- Spoon a heaping tablespoon of the beef mixture into the center of each flattened biscuit.
- Top with a pinch of shredded cheddar.
- Fold the edges up and pinch tightly to seal.
- Place seam-side down on the baking sheet.
Step 5: Add the Garlic Butter Topping
- Mix 1/4 cup melted butter with 1/2 tsp garlic powder.
- Brush over each dough ball generously.
- Sprinkle with Parmesan cheese and parsley if desired.
Step 6: Bake to Perfection
- Bake for 12–15 minutes, or until golden brown and puffy.
- Let cool for a few minutes before serving warm.
🧠 Expert Tips for Success
- Don’t Overfill: A modest amount of filling ensures the dough seals properly and doesn’t burst open.
- Seal Tightly: Pinch the seams well, or use a fork to press the edges.
- Fresh Grated Cheese: Melts better and adds superior texture.
- Air Fryer Option: Cook at 350°F for 8–10 minutes for a crispier exterior.
- Brush Again After Baking: A second garlic butter brush after baking enhances shine and flavor.
🧊 Make-Ahead & Freezing Instructions
To Make Ahead (Unbaked)
- Assemble the bombs as directed.
- Cover with plastic wrap and refrigerate up to 24 hours.
- Bake straight from fridge, adding 2–3 minutes to cook time.
To Freeze (Unbaked or Baked)
- Place unbaked bombs on a tray and freeze until solid.
- Transfer to a freezer-safe bag for up to 2 months.
- Bake from frozen at 375°F for 18–20 minutes, brushing with fresh garlic butter before and after.
♻️ Storing & Reheating Leftovers
| Storage Method | Duration | Reheating |
|---|---|---|
| Fridge | 3–4 days | Oven at 350°F for 10 mins or Air Fryer for 4–5 mins |
| Freezer | Up to 2 months | Thaw overnight and reheat as above |
For best results, wrap leftovers individually in foil or place them in an airtight container lined with parchment paper.
🥣 Serving Ideas & Dipping Sauces
Elevate your cheeseburger bombs with creative pairings:
Best Dipping Sauces
- Classic ketchup and mustard mix
- Garlic aioli or ranch
- Spicy mayo or chipotle sauce
- BBQ sauce with a touch of honey
Perfect Sides
- Sweet potato fries or tater tots
- Coleslaw or garden salad
- Roasted broccoli or carrots
- Pickles or sliced jalapeños
🔄 Flavor Variations You Must Try
1. Spicy Jalapeño Bombs
- Add pickled jalapeños inside each bomb.
- Swap cheddar for pepper jack.
2. Bacon Cheeseburger Bombs
- Add crumbled cooked bacon.
- Use smoked gouda or cheddar.
3. Pizza-Style Bombs
- Use marinara, mozzarella, and pepperoni with beef.
4. Tex-Mex Style
- Add black beans, corn, and a sprinkle of taco cheese blend.
5. Veggie Lover’s Version
- Add sautéed mushrooms, onions, and bell peppers.
❓ Common Questions Answered (FAQs)
Can I use a different dough?
Yes! Crescent rolls or homemade pizza dough work well.
What meat substitutes can I use?
Try ground turkey, chicken, or plant-based meat crumbles.
Can I prepare them in advance for a party?
Absolutely! Prepare and refrigerate up to 24 hours ahead or freeze and bake as needed.
Can I add veggies to the filling?
Yes—try sautéed onions, bell peppers, mushrooms, or even spinach.
Can I make these gluten-free?
Use a certified gluten-free biscuit dough alternative and ensure your taco seasoning is gluten-free.
🧾 Nutrition Information (Per Serving – 1 Bomb)
| Nutrient | Amount |
|---|---|
| Calories | 290 |
| Total Fat | 18g |
| Saturated Fat | 7g |
| Carbohydrates | 20g |
| Fiber | 1g |
| Sugars | 2g |
| Protein | 12g |
| Cholesterol | 40mg |
| Sodium | 540mg |
Note: Nutrition may vary based on ingredients used. Always double-check if you have dietary restrictions.
🖨️ Printable Recipe Card
Garlic Parmesan Cheeseburger Bombs – Quick and Easy Ground Beef Recipes
Prep Time: 10 minutes
Cook Time: 15 minutes
Total Time: 25 minutes
Servings: 8 bombs
Ingredients:
- 1 lb ground beef
- 1 packet taco seasoning
- 1/4 cup water
- 1 can refrigerated biscuits (8 count)
- 1 cup shredded cheddar cheese
- 1/4 cup butter, melted
- 1/2 tsp garlic powder
- 2 tbsp grated Parmesan cheese
- 1 tbsp dried parsley (optional)
Instructions:
- Preheat oven to 375°F and line baking sheet with parchment paper.
- Brown beef in skillet. Drain fat. Add seasoning and water. Simmer 2–3 minutes.
- Flatten each biscuit into a 4-inch round.
- Add beef and cheese to center. Fold and seal into a ball.
- Place seam-side down on the sheet.
- Mix garlic powder and butter. Brush on bombs. Sprinkle Parmesan.
- Bake 12–15 minutes or until golden. Cool slightly and serve.
