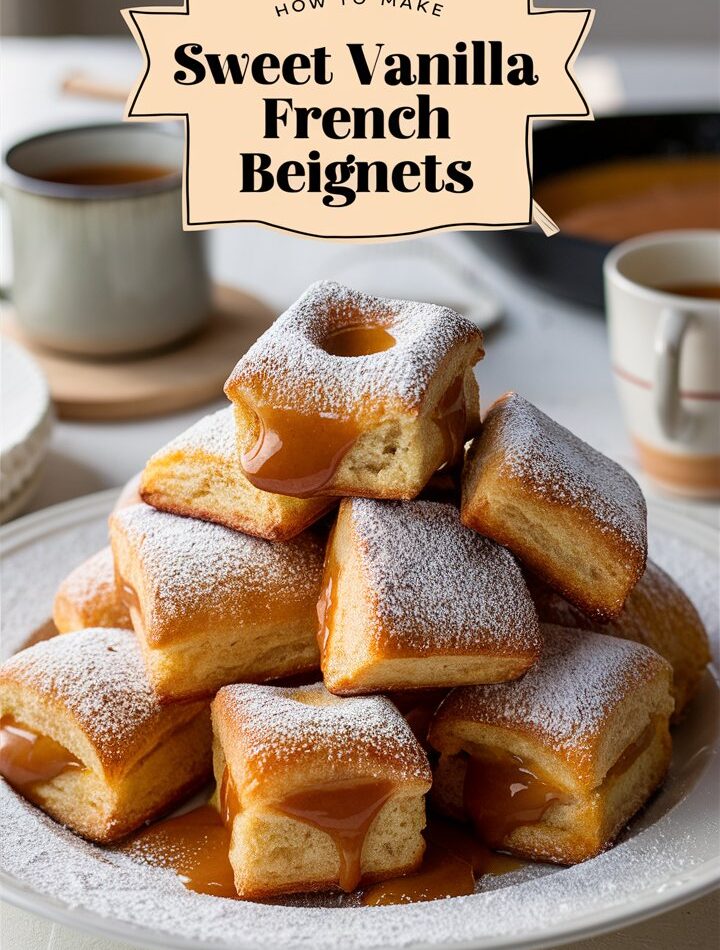
There’s something almost cinematic about biting into a fresh, warm beignet. It’s the type of breakfast treat that blurs the line between simplicity and indulgence. When made right, a vanilla French beignet is crisp on the outside, tender and airy on the inside, and generously blanketed in powdered sugar. It’s an edible cloud—light, flavorful, and deeply satisfying. Whether you’re crafting breakfast for loved ones or just treating yourself to something extraordinary, this Vanilla French Beignets recipe will easily become your go-to sweet escape.
And don’t be fooled by its elegant outcome. This is a recipe rooted in ease—ideal for beginners yet refined enough to satisfy seasoned bakers. With this 3500+ word guide, you’ll get the complete breakdown: ingredients, technique, storage tips, variations, and helpful tricks for making your beignets bakery-worthy every time.
1. What Are French Beignets?
Originating from France and popularized in New Orleans, beignets are essentially deep-fried pastries—somewhere between a doughnut and a fritter. The traditional beignet is a square piece of yeasted dough, fried to golden perfection and covered in a generous cloud of powdered sugar.
Unlike denser fried pastries, beignets are light, puffy, and airy. They’re best enjoyed fresh and warm, though with the right techniques (which we’ll cover), you can still enjoy leftovers later.
2. Why This Vanilla Version Stands Out
Most classic recipes stick to plain dough, letting the sugar topping do all the talking. But we’re elevating things with vanilla extract—infusing a subtle yet irresistible aroma and flavor that turns the ordinary into unforgettable.
Here’s why this recipe is worth bookmarking:
- Beginner-friendly instructions
- No fancy equipment needed
- Flexible for air fryer or deep fryer
- Perfect balance of sweet and subtle
- Make-ahead and freezer-friendly
- No artificial shortcuts—just honest, home-kitchen flavor
3. Ingredients Breakdown
Here’s everything you need, along with tips to get the best result:
| Ingredient | Quantity | Purpose |
|---|---|---|
| Warm Milk | 1 cup (110°F) | Activates yeast for a fluffy dough |
| Granulated Sugar | 1/4 cup | Feeds the yeast, sweetens dough |
| Active Dry Yeast | 2 ¼ tsp | Creates rise and airy texture |
| Large Eggs | 2 | Adds structure and richness |
| Unsalted Butter (melted) | 1/2 cup | Moisture and flavor |
| Pure Vanilla Extract | 1 tsp | Signature aroma and taste |
| All-purpose Flour | 4 cups | Base of the dough |
| Salt | 1/2 tsp | Balances sweetness |
| Vegetable Oil | For frying | Neutral oil that won’t affect taste |
| Powdered Sugar | For dusting | Classic finishing touch |
4. Tools You’ll Need
You don’t need any professional kitchen setup, just a few basics:
- Large mixing bowl
- Measuring cups and spoons
- Whisk or hand mixer
- Dough cutter or sharp knife
- Rolling pin
- Thermometer (for oil temp)
- Deep saucepan or fryer
- Slotted spoon or tongs
- Paper towels
- Cooling rack
5. Step-by-Step Recipe Instructions
Step 1: Activate Yeast
In a large bowl, combine warm milk and sugar. Stir gently, then sprinkle yeast over the top. Let it sit for 10 minutes. If the mixture becomes foamy, your yeast is active and ready.
Pro Tip: If it doesn’t foam, your yeast may be expired. Restart with fresh yeast.
Step 2: Mix Wet Ingredients
Whisk in the eggs, melted butter, and vanilla extract into the yeast mixture until smooth.
Step 3: Add Dry Ingredients
Gradually add flour and salt while stirring. Mix until a sticky dough forms.
Step 4: Knead the Dough
Transfer dough to a floured surface and knead for about 8 minutes, or until smooth and elastic.
Step 5: Let It Rise
Place dough in a greased bowl, cover it with a damp cloth or plastic wrap, and let it rise in a warm area for 1–2 hours, or until doubled in size.
Step 6: Shape the Dough
Once risen, punch down the dough. Roll it out to about ½ inch thick and cut into squares or circles using a knife or dough cutter.
Step 7: Heat Oil
Heat oil in a deep pan to 350°F (175°C). Carefully drop in a few beignets at a time.
Step 8: Fry the Beignets
Fry each side for 1–2 minutes until golden brown. Avoid overcrowding the pan.
Step 9: Drain and Dust
Place fried beignets on paper towels to drain, then immediately coat generously with powdered sugar.
6. Expert Tips for Perfect Beignets
- Temperature control matters: Use a thermometer to keep oil around 350°F.
- Avoid dense dough: Don’t add too much flour, or over-knead.
- Let the dough rest: A well-rested dough = lighter texture.
- Shake with sugar in a paper bag: It coats evenly and looks more festive.
- Eat fresh: Beignets are best within the first few hours of frying.
7. Make-Ahead Instructions
Want fresh beignets without the early-morning hassle?
- Option 1: Refrigerate the dough overnight after kneading. Let it warm up before shaping and frying.
- Option 2: Freeze raw cut dough and thaw before use. This is perfect for brunch guests.
8. Air Fryer & Alternative Cooking Options
Yes, you can air-fry beignets!
- Preheat your air fryer to 350°F.
- Spray shaped dough with a light mist of oil.
- Air fry for 7–9 minutes, flipping once.
They won’t be quite as airy or golden as the deep-fried version, but still delicious.
9. Storage and Reheating Guide
Beignets are meant to be eaten fresh, but here’s how to enjoy them later:
- Room Temp: Store in an airtight container for up to 2 days.
- Fridge: Store for up to 3–4 days; reheat in oven to crisp up.
- Freezer: Freeze raw dough or cooked beignets. Reheat at 325°F for 8–10 minutes.
10. Serving Suggestions
Serve beignets with:
- Fresh coffee or espresso
- Fruit compote or berry jam
- Nutella or chocolate sauce
- Light vanilla glaze
- Cinnamon sugar twist
Want to go fancy? Stack them on a platter and drizzle with honey before dusting.
11. Nutritional Facts (Per Beignet)
| Nutrient | Amount |
|---|---|
| Calories | 210 |
| Fat | 11g |
| Saturated Fat | 6g |
| Sugar | 10g |
| Protein | 3g |
| Carbs | 24g |
| Fiber | 1g |
| Sodium | 105mg |
| Cholesterol | 45mg |
12. Variations to Try Next
- Chocolate-stuffed beignets
- Lemon-zest and sugar coating
- Cinnamon vanilla glaze
- Savory beignets with cheese and herbs
- Gluten-free flour substitution
13. Frequently Asked Questions
Can I skip the eggs?
You can try an egg substitute (like flax eggs), but texture may vary.
Can I use whole wheat flour?
Yes, but use 50/50 with all-purpose to avoid a dense result.
Can I bake these instead?
Yes, but they’ll lose the crisp texture. Bake at 375°F for 12–15 minutes.
14. Final Thoughts
This Vanilla French Beignets recipe strikes the perfect balance between indulgence and simplicity. It’s a nod to classic French technique, refined with easy-to-follow steps that turn any morning into something special.
Whether it’s a brunch centerpiece, weekend treat, or just your way to start the day sweetly—this recipe delivers joy in every bite. Bookmark it, share it, and make it your own.
Because the best recipes aren’t just about ingredients—they’re about memories. And trust us, this one’s unforgettable.