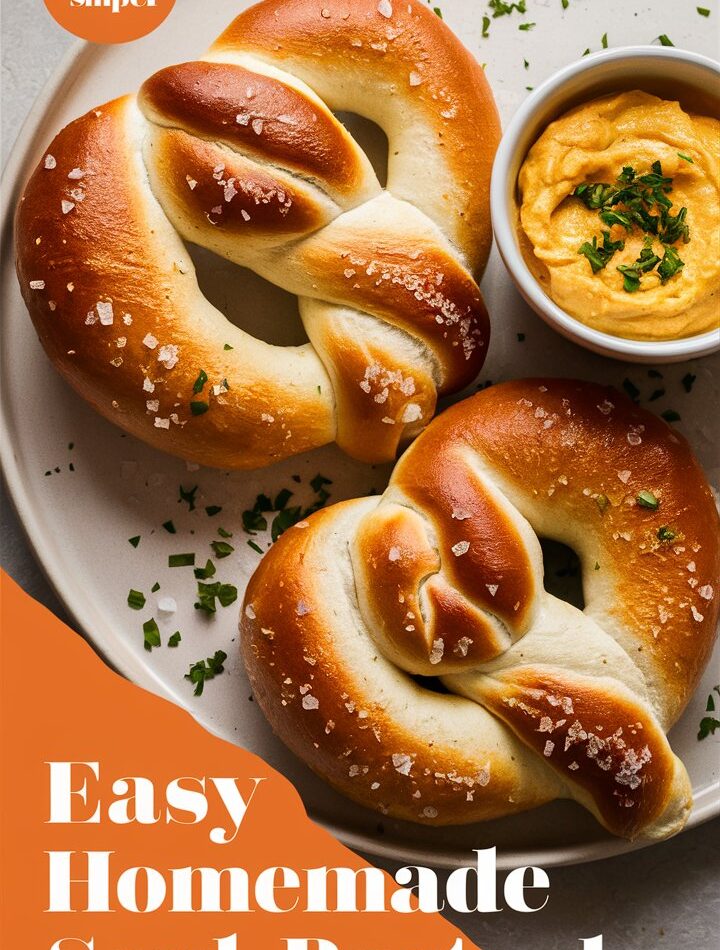
There’s something universally comforting about soft pretzels. Warm, golden-brown, slightly crisp on the outside, and irresistibly pillowy on the inside—every bite carries the essence of nostalgia. Whether you remember them from bustling mall kiosks, baseball stadiums, or cozy autumn fairs, soft pretzels feel like edible hugs. But what if you could recreate that exact joy in your kitchen—without artificial flavors or standing in line?
This guide will walk you through the art of making perfect homemade soft pretzels. From ingredients and dough techniques to shaping, boiling, and baking, we’re not just covering the basics—we’re giving you the complete pretzel-making experience.
This is not your average recipe post. It’s a masterclass—a deep dive into techniques, variations, expert tips, and even gluten-free or vegan adjustments. Whether you’re a baking enthusiast or a beginner who’s never shaped dough before, this article has everything you need to know.
Let’s twist and bake.
1. Why Make Pretzels at Home?
Homemade pretzels are so much more than flour, water, and salt. They’re warm comfort, an aroma that fills your kitchen, and a rewarding sense of “I made this.”
🥨 Here’s what makes homemade pretzels special:
- Fresher than store-bought: You control the ingredients and bake them fresh.
- Healthier options: Skip preservatives and tweak salt or sugar.
- Customizable: Sweet, savory, spicy, or stuffed—your oven, your rules.
- Budget-friendly: A batch costs less than one mall pretzel.
- Fun and family-friendly: Great weekend activity with kids.
2. Key Ingredients and Their Roles
Let’s break down each ingredient so you understand its function—not just follow a list.
| Ingredient | Role |
|---|---|
| Warm Water (110°F) | Activates the yeast and binds the dough |
| Active Dry Yeast | Makes the dough rise; essential for softness |
| Granulated Sugar | Feeds the yeast and adds subtle sweetness |
| Salt | Enhances flavor and tightens dough structure |
| All-Purpose Flour | The backbone of the dough |
| Baking Soda | Reacts in boiling water to create signature pretzel crust |
| Egg (for wash) | Gives glossy finish and helps salt stick |
| Coarse Salt | Final touch for texture and burst of flavor |
🔸 Optional Additions: melted butter, garlic powder, cinnamon sugar, shredded cheese.
3. Equipment You’ll Need
Nothing too fancy, just reliable kitchen tools:
- Large mixing bowl
- Wooden spoon or stand mixer with dough hook
- Measuring cups and spoons
- Slotted spatula
- Parchment paper
- Baking sheets
- Clean kitchen towel
- Large pot (for boiling water + baking soda)
4. Step-by-Step Soft Pretzel Recipe
Prep Time: 20 minutes
Rise Time: 60 minutes
Cook Time: 15 minutes
Total Time: ~1 hour 35 minutes
Servings: 8 large pretzels
🌾 Ingredients:
- 1 ½ cups warm water (110°F)
- 1 packet active dry yeast (2 ¼ tsp)
- 1 tbsp granulated sugar
- 1 tsp salt
- 4 cups all-purpose flour
- ⅔ cup baking soda (for water bath)
- 1 large egg, beaten
- Coarse salt (for topping)
🧑🍳 Instructions:
Step 1: Activate the Yeast
In a large mixing bowl, add warm water and sprinkle yeast over it. Let it sit for 5 minutes until it becomes frothy. If not, your yeast might be expired.
Step 2: Mix the Dough
Stir in sugar and salt. Add flour gradually, mixing with a spoon or dough hook. Once it comes together, knead by hand or mixer for 8 minutes until dough is smooth and elastic.
Step 3: Let It Rise
Place dough in a lightly oiled bowl. Cover with a towel and let it rise in a warm spot for 1 hour until it doubles in size.
Step 4: Prepare Baking Soda Bath
Preheat your oven to 450°F. Boil 10 cups of water in a large pot. Slowly add the baking soda (it will foam).
Step 5: Shape the Pretzels
Divide dough into 8 pieces. Roll each into a rope (~20 inches), then twist into a traditional pretzel shape (loop + twist + press ends).
Step 6: Boil the Pretzels
Drop each shaped pretzel into the baking soda bath for 30 seconds. Remove with slotted spatula and place on parchment-lined baking sheet.
Step 7: Add Finishing Touches
Brush each pretzel with beaten egg. Sprinkle with coarse salt or your desired topping.
Step 8: Bake to Perfection
Bake for 12–14 minutes until golden brown and firm. Cool for 5 minutes before serving.
5. What Makes Pretzels Unique: The Baking Soda Bath
This step is non-negotiable. Boiling pretzels in alkaline water before baking:
- Gives them a deep brown color
- Produces a distinct chewy crust
- Sets the shape before baking
Baking soda creates a basic environment similar to lye (used in traditional Bavarian pretzels), but it’s safer for home cooks.
6. How to Shape a Pretzel (Textual Guide)
- Roll dough into a long rope (about 20 inches).
- Form a “U” shape.
- Twist the ends twice, then fold them back down to the base.
- Press gently to seal.
✏️ Pro tip: Practice on a string before working with dough.
7. Creative Pretzel Variations
🍫 Sweet Twists
- Cinnamon Sugar: Brush with butter after baking. Toss in cinnamon sugar.
- Chocolate Drizzle: Melt chocolate chips and zig-zag over cooled pretzels.
- Apple Pie: Fill ropes with apple compote before shaping and bake.
🧀 Savory Upgrades
- Cheddar Jalapeño: Add chopped jalapeños and cheddar before twisting.
- Garlic Butter Parmesan: Brush with garlic butter and top with grated Parm.
- Stuffed Pretzels: Add a strip of mozzarella inside the rope before shaping.
8. Make-Ahead Tips for Busy Bakers
⏱️ Prep Now, Bake Later:
- Shape pretzels and freeze them on a tray.
- Once frozen solid, transfer to bags.
- When ready, thaw 10 minutes, then proceed with boiling and baking.
🌙 Overnight Option:
- Shape and refrigerate for up to 16 hours.
- Bring to room temp before boiling and baking.
9. Storage, Reheating, and Freezing Instructions
- Room Temperature: Store in airtight bag up to 2 days.
- Freezing: Wrap individually, freeze up to 2 months.
- To Reheat:
- Oven: 300°F for 8–10 min
- Microwave: Wrap in damp towel, 15–20 sec
10. Common Mistakes to Avoid
❌ Skipping the baking soda bath: No crust, no chew—no real pretzel.
❌ Using cold water for yeast: It won’t activate. Always warm.
❌ Over-kneading the dough: Can make pretzels too tough.
❌ Overcrowding the pan: Space them out or they’ll stick and steam.
❌ Not sealing the pretzel shape: Ends will pop loose in the boil.
11. Serving Ideas and Pairings
- Dips: Cheese sauce, mustard, hummus, chocolate ganache
- Sandwich base: Slice in half and stuff with ham and Swiss
- Brunch Board: Mini pretzels with fruit, cured meats, and dips
- Game Day Platter: Serve with beer cheese, chili dip, and pickles
12. Gluten-Free and Vegan Adaptations
🌾 Gluten-Free Option:
- Use 1:1 gluten-free flour with xanthan gum.
- Increase kneading time slightly.
- Texture may be a bit more crumbly but still satisfying.
🌱 Vegan Version:
- Skip egg wash—use almond milk or olive oil for shine.
- Double-check yeast and sugar for vegan-friendly certifications.
13. Nutrition Facts (Per Pretzel)
| Nutrient | Amount |
|---|---|
| Calories | 260 |
| Carbs | 52g |
| Protein | 6g |
| Fat | 2g |
| Saturated Fat | 0.5g |
| Cholesterol | 20mg |
| Sodium | 870mg |
| Fiber | 2g |
| Sugar | 1g |
14. Frequently Asked Questions (FAQ)
❓Can I skip the baking soda bath?
No. It’s essential for texture and color. Without it, you’re baking soft bread—not pretzels.
❓Why are my pretzels pale?
Make sure your oven is fully preheated and your baking soda is fresh.
❓How long can I freeze unbaked pretzels?
Up to 2 months. Thaw slightly before boiling and baking.
❓Can I use instant yeast?
Yes, but reduce rising time. Check dough rather than the clock.
❓What toppings work best?
Salt, sesame seeds, shredded cheese, garlic flakes, cinnamon sugar, even everything bagel seasoning!
15. Final Thoughts + Call to Action
Homemade soft pretzels aren’t just a recipe—they’re an experience. From the scent of the rising dough to the first warm, salty bite, each step is satisfying in its own way. They’re easy enough for beginners yet customizable for seasoned bakers. Perfect for parties, game nights, or solo snacking, these golden twists will never go out of style.
Try them once, and they’ll become a family tradition. ❤️
👉 What’s next?
- Pin this recipe for later
- Leave a comment below with your favorite variation
- Tag us @YourKitchenTwist on Instagram—we love seeing your bakes!